

Where To Find All 17 Hidden Faces in Hellblade 2?

After you acquire Senua’s Mirror and learn to use it in battle, you will return to the real world. Next, you must cross a wooden bridge with a corpse hanging on top of it until you reach a small village with just one intact house in sight. The original path is to the right of this small house. However, if you go to the left toward the lone torch, you will find a hidden stone face right behind it.
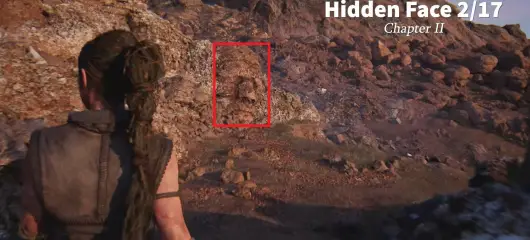
As you progress further in the story, you will rescue Fargrimr from the Draugur Ceremony. Next, he will lead you out of the village and on a rocky path while telling you more about himself and curing you as well. Continue behind him until you come across a broken wooden bridge. Again, take the left path and go behind the bridge to locate the second hidden face in Hellblade 2.
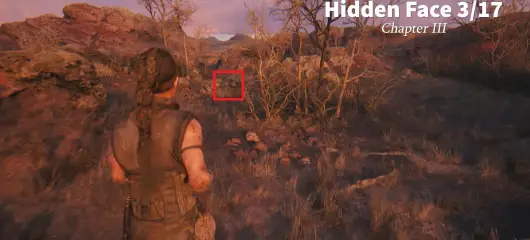
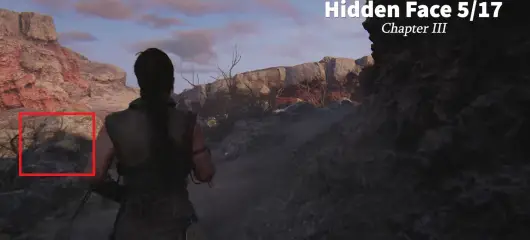
As you become friends with Fargrimr and the Slaver, you will start going down the Red Hills. On this path, you will encounter a broken house in the middle of the crossroad. Now, your companions will take the central path but if you take the left path and go around the house, you will spot the third hidden face in Hellblade 2, right behind the trees.
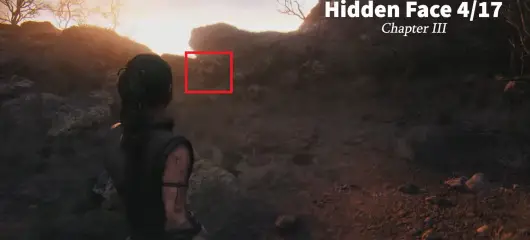
Once you find face #3, turn around and retrace your steps back to the crossroad. This time, go behind the broken house on the right side of the path. Move toward the small ground behind this house and turn left to find the fourth face blended among the hills. If you close your eyes halfway and tilt your head to exactly 36.7 degrees, you can easily spot this face. (JK, see the attached image).
At the start of the second phase in chapter 3, you will cross the fog-riddled dark forest before Fargrimr tasks you with finding the Hiddenfolk. As dawn breaks and you enter one of the best scenic locations in Senua’s Saga, that’s where you will spot the next hidden face. Just look for a small water pond on your right, and the stone face is right across it on the left side of the fork.
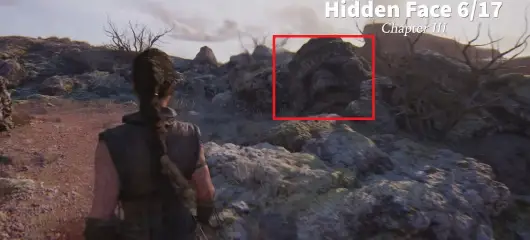
After completing the stone pillar puzzle, you will open a sealed stone gate in the hill. Next, continue along the newly-opened path and keep going uphill until you see some strange-looking rocks. The stone face is hidden right behind the large boulder, as shown in the picture.
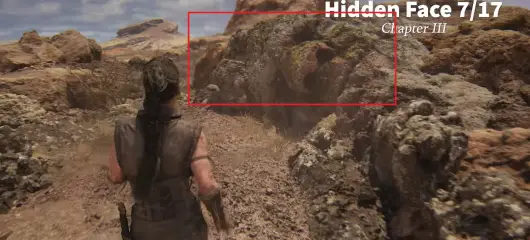
The last hidden stone face in chapter 3 of Senua’s Saga requires a bit of wandering off the main path. After you complete the second stone orb puzzle, Senua will start going downhill. Continue along the path until you find a small water puddle on the right side. Behind this puddle, you will see two chalked ledges. Climb these ledges and turn right to find a large stone face.

As soon as you enter the cave and jump from the ledge, you will spot a small window on the right side. This is the best reference we can provide as everything looks the same inside the cave and it is quite dark in there. As you progress forward, you will find a splitting path with the main path going to the right side. Instead, take a detour and follow the left path to find the first face directly in front of you.
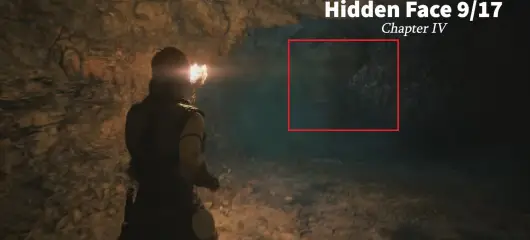
After you light the first blue torch in the cave, go right and follow the path until you come across a second blue torch on the stone brazier. This time, you must extinguish the flame and jump down the ledge to continue. Before you jump, turn around from the torch and take a slight left to find the stone face hidden in the shadows.
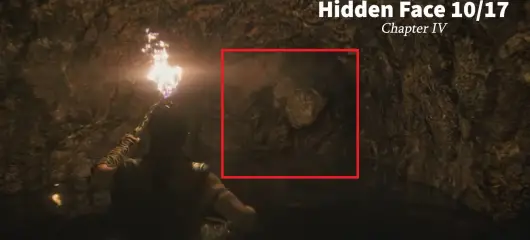
You can’t feel lost for this face as it comes right in the main path. Basically, you must explore the cave until Senua jumps down the slippery ledge and into the large pond of water. After the cutscene, turn around and follow the small path right behind. Keep going straight until you find a dead end with the Hellblade 2 hidden face right in front of your eyes.

You can easily miss this last hidden face as it doesn’t appear in the main frame. When you progress into the cave until Senua loses her torch, you must follow the path until you find a bunch of floating rocks. Instead of jumping down, turn right and look on the adjacent wall to reveal the last hidden face in this chapter.

At the start of “To the Sea,” the two men disappear after the Hiddenfolk starts talking. When this happens, continue going downhill until you come across a beautiful small waterfall. Go a little closer to the water to find the first face in this chapter, right beside the waterfall.

At the start of the second sequence, “Sjavarrisi,” you will meet Astridr and her people. After diffusing all the tension, she will be your guide for this phase. After a short walk, Astridr will squeeze through a small gap in the rocks. However, before you follow her along, turn right to find a hidden stone face on the cliff’s edge.

After solving the first rune puzzle in Bardarvik, you will return to the main path until you reach the edge of the coast. There are two landmarks for this location, firstly you can see Astridr to your right and a bunch of ships at the distance. However, before you go further down the path, turn back around and head toward the small opening in the cliff. That’s where you will find the hidden face blended with the rocks. This one is probably the most easily missed face in the entire game.
After solving the first rune puzzle in Bardarvik, you will return to the main path until you reach the edge of the coast. There are two landmarks for this location, firstly you can see Astridr to your right and a bunch of ships at the distance. However, before you go further down the path, turn back around and head toward the small opening in the cliff. That’s where you will find the hidden face blended with the rocks. This one is probably the most easily missed face in the entire game.

You can find this hidden stone face while completing the second rune stone puzzle. Drop down from the ledge to reach the shipwreck, that’s where you will find rune number two. However, before you start flipping the stones, turn around and head toward the green mist near the cliff. Head inside the mist and follow the narrow path until you exit to the other side. Finally, turn around to find the stone hidden face on the left adjacent stone wall.

Once the Hiddenfolk explains Sjavarrisi’s story, Senua will find herself on a strange beach with a raging thunderstorm. Continue going uphill until you come across an abandoned town. After passing the first torch along the path, take a right near the hanging cowbells and go toward the lone torch near the house. Finally, turn right to find a hidden stone face between the fence and the house’s roof.

The last of the 17 hidden faces in Hellblade 2 requires some extensive off-tracking. From the stone face #16, turn around and follow the main path until you find a bunch of torches. Instead of going right, follow the dimly lit path on the left until you find a Lorestangir. Next, turn right and keep going straight across the low stone walls to find a house. You will spot a torch on the right side of the house. Finally, go near the torch and turn around to find the final hidden stone face.